
- All sizes have same ease of installation.
- Locate area for installation of Curb-O-Let.
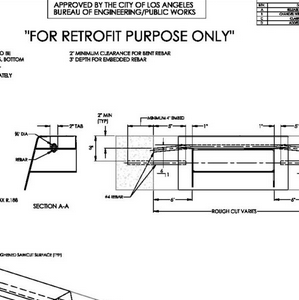
- Cut-out should be measured to include an extra 6” on each side of the Curb-O-Let flange. Cut existing curb and roughen saw cut surface.
- Drill 4” deep holes through the middle of each of the roughened saw cuts of the curb.
- Insert #4 rebar into the drilled holes using an OSHA approved adhesive. Rebar should extend from the saw cut, to the edge of the Curb-O-Let flange.
- Place Curb-O-Let nailing flange on curbside of lumber form, make sure top of Curb-O-Let is flush with top of form (this provides a self leveling effect).
- Nail Curb-O-Let to form, using holes provided on the support nailing flange (this is all the support needed).
- Insert #4 rebar into the hole provided under top of the Curb-O-Let. Rebar should extend at least 6” past each side flange. Bend rebar down 2” on each side.
- Place the face of the curb form lumber against the face of the Curb-O-Let.
- Pour concrete into form.
- After concrete is poured and cured, remove forms.
- Curb-O-Let is now an integral part of the curb and your installation is complete.
Curb-O-Let.Retro-fit
